If you’ll recall, I decided back in June on the last day of the Origami USA annual convention to write an origami book of my original models. How’s it going, you might ask. Well I’m glad you asked. It’s off to a good start.
I’ve competed diagrams for three models in the last two months. Two of them, the Hot Air Balloon and the Loon, are all-new. The third, the Canoe, is an update of a model that I’d already diagrammed. The update is nontrivial because I’m now using a new process and a new style. I really want to get my diagramming up to the next level. There’s really no point in doing a book unless it’s excellent.
My old way of working was to use Flash to generate the steps and then animate them into a sfw for publication on the web. This was a pretty good way to share diagrams without having to worry too much about people ripping them off. It’s really hard to make printouts from a sfw. On top of that, I’ve been submitting a model every year to the OUSA annual collection, and to generate this document I would just export the frames from Flash and paste them into a Word document.
This approach was not very flexible, and had some drawbacks. Foremost, the diagrams were designed to look good on a computer screen not a printed page. I used various shades of light and dark grey instead of black and white. I drew them so one step would fill the screen, where in print the diagram for a step is less than 2 inches square. So I ran thru a series of experiments to get things to look better in print. The colors (now just simple black and white and 30 percent grey), the line weights for edges and creases, the line weights and dash lengths for mountain and valley folds, and sizes of the arrows all underwent some serious scrutiny. I’ve been checking my collection of origami books for all the various stylistic choices to see which ones I want to follow. Also I’ve started using zoomed-in drawings for details, which is something I’ve not really done before. I’ve started breaking down complex steps into series of simpler steps, which is tedious but worth it. I made a lot of test printouts to see how things look in actual size. I need to take my diagrams and print them out on different printers.
The other thing I did was to start using some real page layout software. I’m using InDesign from Adobe, and it’s very well-suited to my needs. I can import the steps as eps images and freely mix graphics and text areas, and build flexible templates. The whole app is designed with professional print designers in mind, the modern day descendant of Aldus PageMaker. I’m sure it can do way more powerful stuff, but for these common tasks it’s really a breeze. I export the diagram to an eps to print, and it’s perfect fidelity. I’m treating each model as a document, but when the time comes to layout the book, I can import them into a master document that encapsulates the whole book. Meanwhile, this fall I’m going to get a 3-ring binder (how anachronistic!) so I can make a physical prototype of the book, and pop in the models as they get diagrammed.
I had figured the book will take about two years, with the first year concentrating mainly on diagramming and the second on assembling the book and getting it published. Well if I can get 3 models done every 2 months, that’ll be 18 diagrams this year, which is more than halfway but still leaves a good way to go. I’m estimating somewhere between 20 and 30 models total, and I haven’t tackled any of the really complex ones yet. I have about a dozen models already diagrammed, although I’ve changed the designs for about half of them, and they’ll all need to be redone for styles. So hopefully as fall comes and turns to winter I’ll be able to pick up the pace a bit.
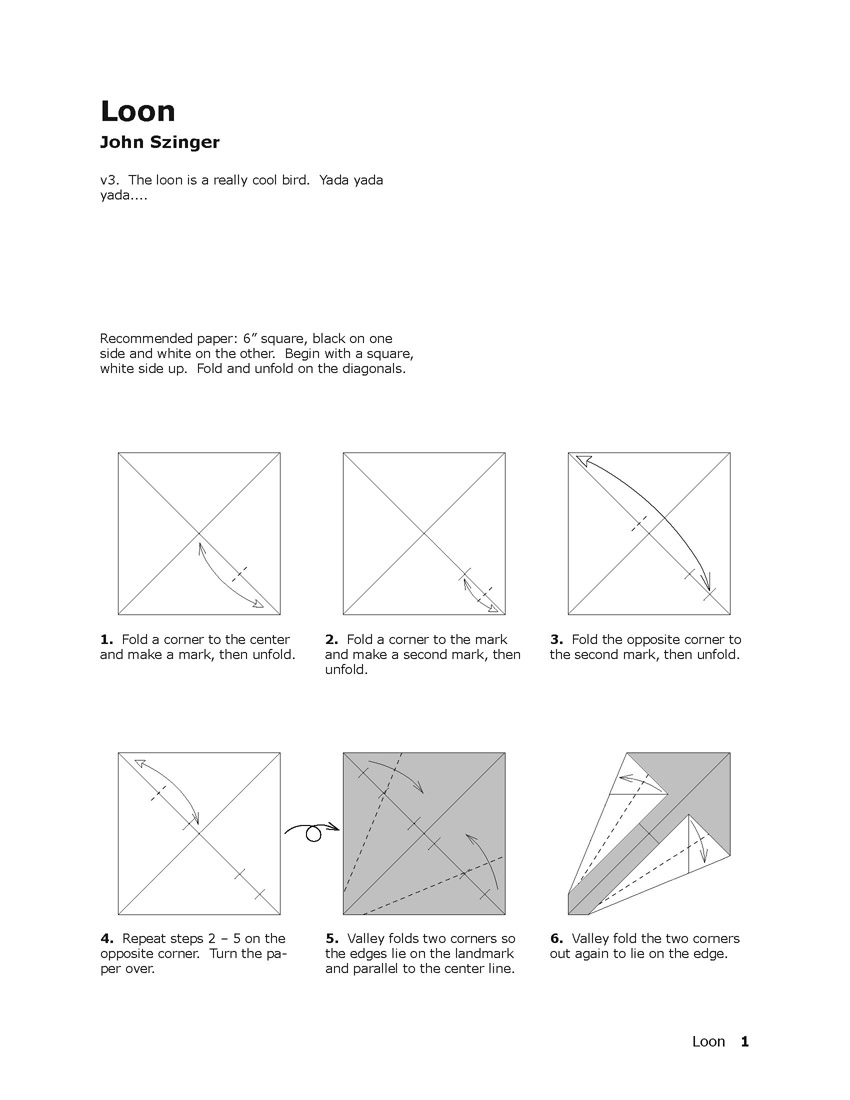
Here’s a screen grab of one of my pages. There’s a space at the top of each model for a picture and a blurb about the subject, folding process, or whatever info is appropriate.